
To declare your crypto we need the complete history of your transactions. On Coinbase you will need to export the CSV files and connect your account by API. If you also traded on Coinbase Pro, there are additional files to export. Here is how to do all of it.
Part 1: exporting your Coinbase history
Step 1: sign in to your Coinbase account
- Go to coinbase.com
- Log in with your email and password
- Complete the 2FA check if you have it switched on
Step 2: open the Statements section
- Click your profile (top right-hand corner)
- Choose “Account”
- Open the “Statements” section
Step 3: generate the custom statement
In the “Generate custom statement” section, set the following fields:
- Asset: pick a single asset or leave it on all
- Transaction type: pick a type or leave it on all
- Date: choose a date range covering your entire history
- Format: choose CSV
- Click “Generate”
Step 4: download the file
- Coinbase sends an email with the download link
- Open the email and download the CSV file
Part 2: exporting your Coinbase Pro history
⚠️ Important: although Coinbase Pro no longer runs as a separate platform (it was merged into Coinbase), your Pro trading history is still available in the Coinbase statements section. If you traded on Coinbase Pro, you need to export two different files to have the complete history.
Why TWO Coinbase Pro files?
Many clients assume one file is enough, but both are needed:
| File | What it holds | What it is for |
|---|---|---|
| Account | Deposits, withdrawals and account movements | The complete record of funds |
| Fills | Order executions (buys and sells) | Working out gains and losses |
Without the Fills file you have no buy and sell prices. Without Account, deposits and withdrawals are missing. You need both.
Step 1: open the Statements section
- Sign in to your Coinbase account
- Go to the Statements page
Step 2: select the Coinbase Pro tab
- On the statements page, click the tab labelled “Coinbase Pro”
Step 3: generate the Account file
In the “Generate custom statement” section:
- Report type: Account
- Portfolio: all portfolios
- Account types: all accounts
- Date: select the year in question
- Format: CSV
- Click “Generate”
Step 4: generate the Fills file
Repeat the process, changing only the report type:
- Report type: Fills
- Portfolio: all portfolios
- Account types: all accounts
- Date: the same year as the previous file
- Format: CSV
- Click “Generate”
Step 5: repeat for every year
If you traded on Coinbase Pro across several years, you must generate the Account and Fills files for each calendar year. If you traded in 2020, 2021 and 2022, for instance, you will end up with six files in total (two per year).
Step 6: download the files
- Coinbase sends an email with the download link for each report
- Download every CSV file
Part 3: connecting Coinbase by API
On top of the CSV files, we need you to connect your Coinbase account using manual API keys. Read access to your transactions, trades and balances is all we need. Do not switch on trading or withdrawal permissions.
⚠️ Important: Coinbase has moved API key creation to the Coinbase Developer Platform (CDP). The old “legacy” API keys can no longer be generated; every new key is created from the CDP portal and comes in a different format.
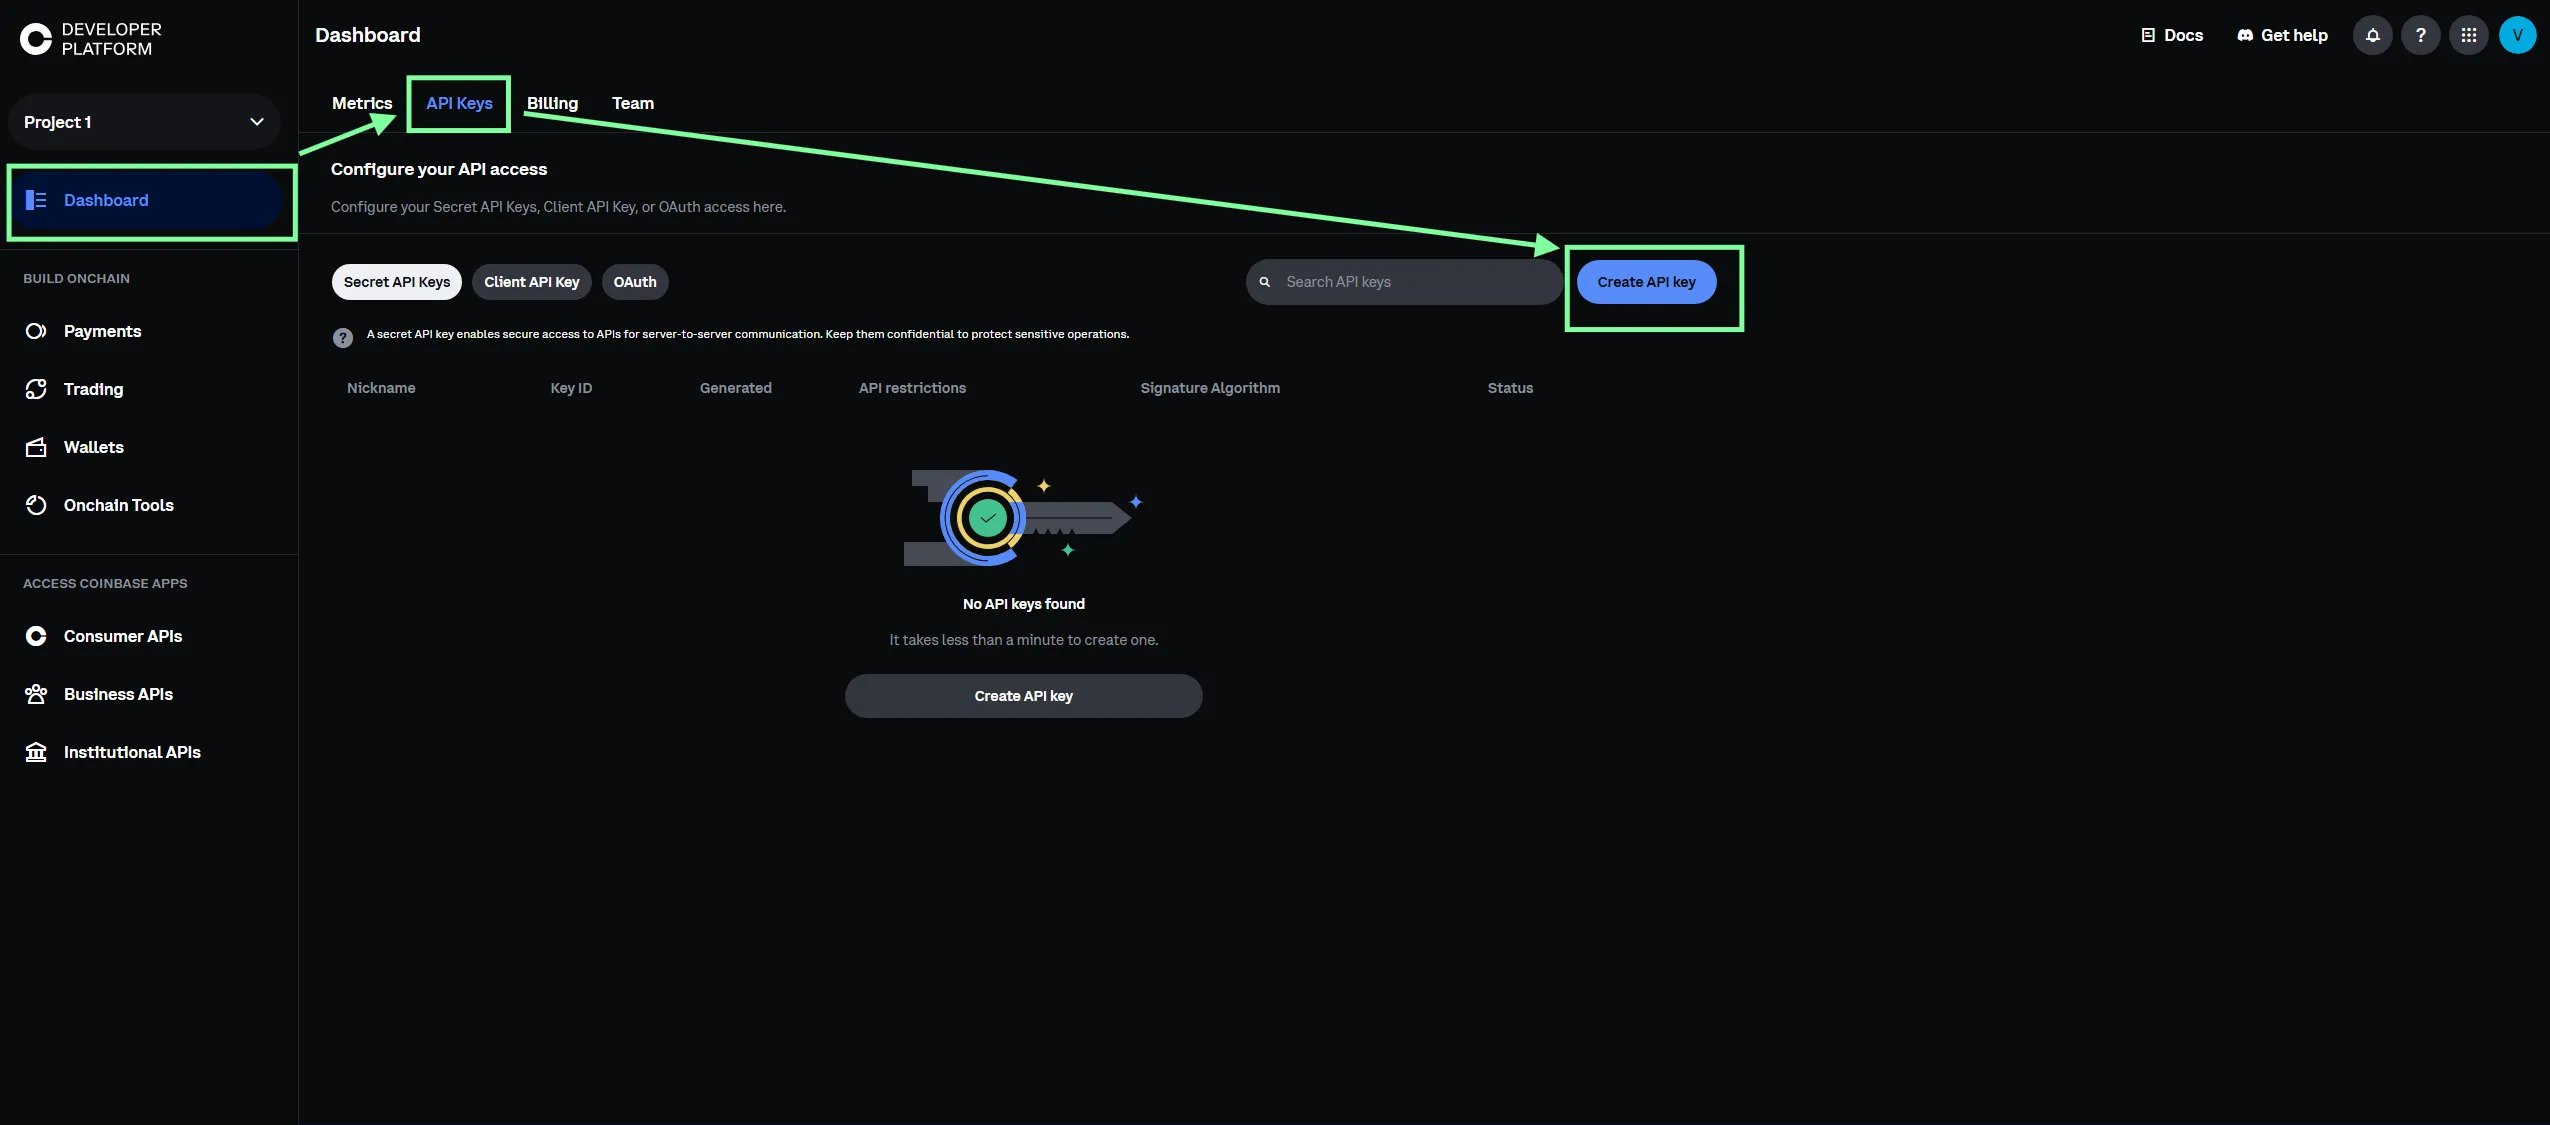
Step 1: open the Coinbase Developer Platform
- Go to portal.cdp.coinbase.com/projects/api-keys and sign in with your Coinbase account.
- In the left-hand menu choose Dashboard, then open the API Keys tab at the top.
- Click the blue “Create API key” button.
Step 2: configure the API key
A modal opens with every setting. Configure it like this:
- API key name: give it a descriptive name (for example
Renta2025orcolvence). - API restrictions → Global restrictions → IP whitelist: leave it empty. Do not add any IP address, or the connection will fail when it comes from a different IP.
- Permissions: tick “View” only. Do NOT tick Trade, Transfer or Manage. Leave “Server Wallet” switched off too.
- Open Advanced settings and, under Signature algorithm, select ECDSA.
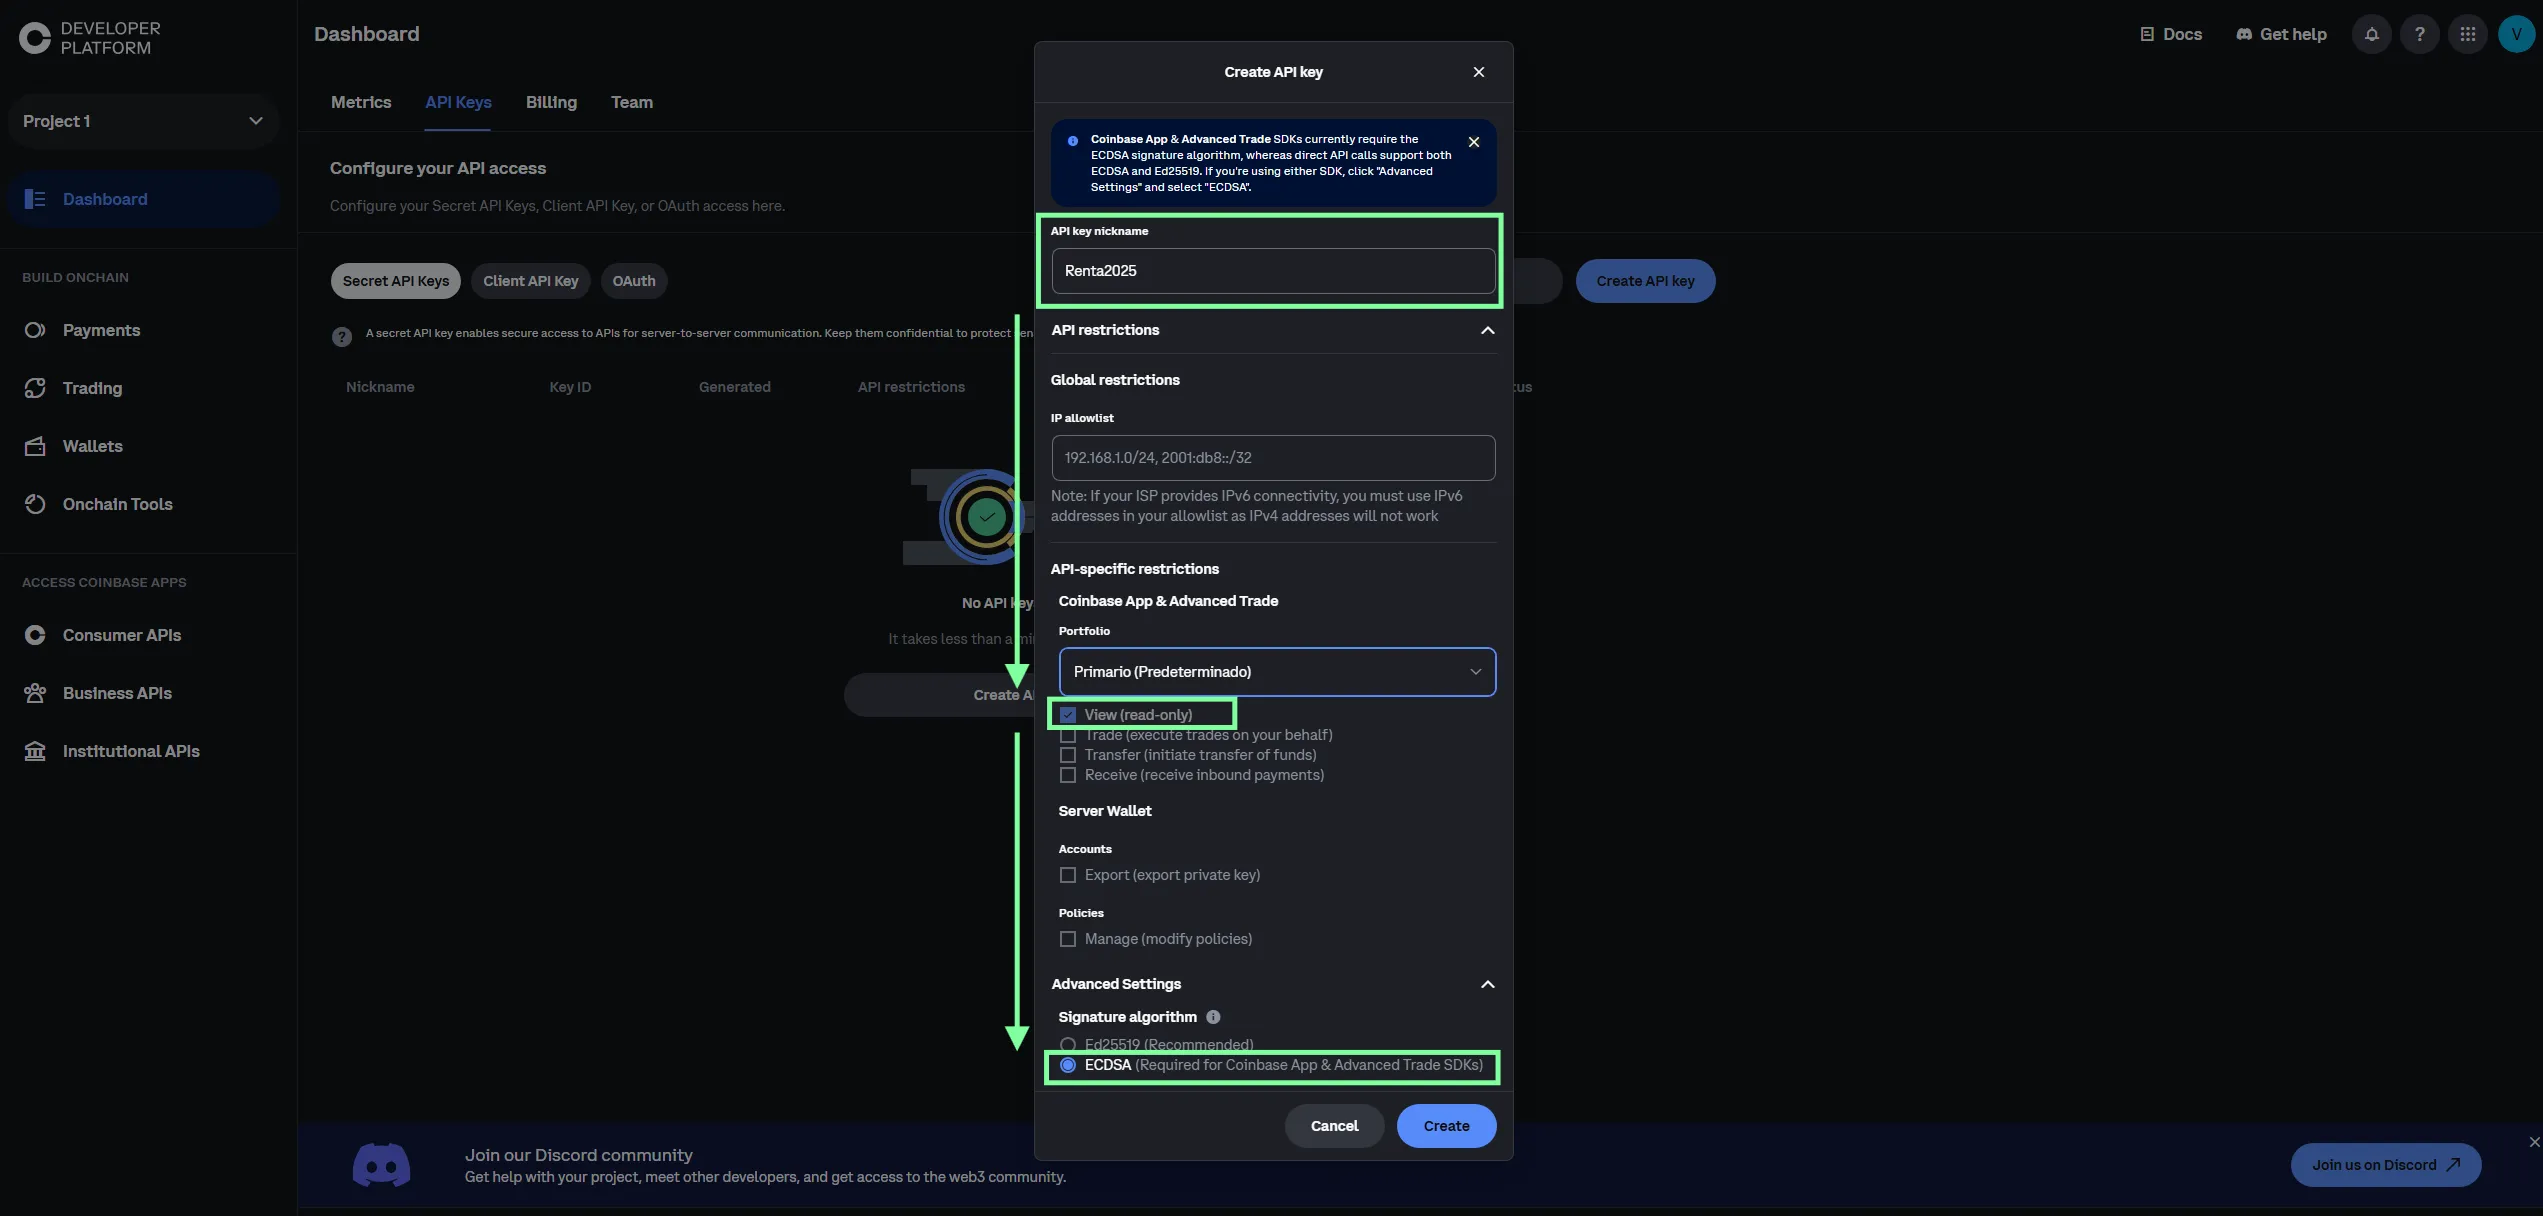
- Click “Create”.
- Coinbase asks for the CDP 2FA code (which may differ from your coinbase.com 2FA). Enter it to confirm.
Step 3: save and copy the API key and the secret
Once confirmed, the “Save your API key” modal appears with two fields:
- API key ID: starts with
organizations/... - Secret: a block starting with
-----BEGIN EC PRIVATE KEY-----and ending with-----END EC PRIVATE KEY-----
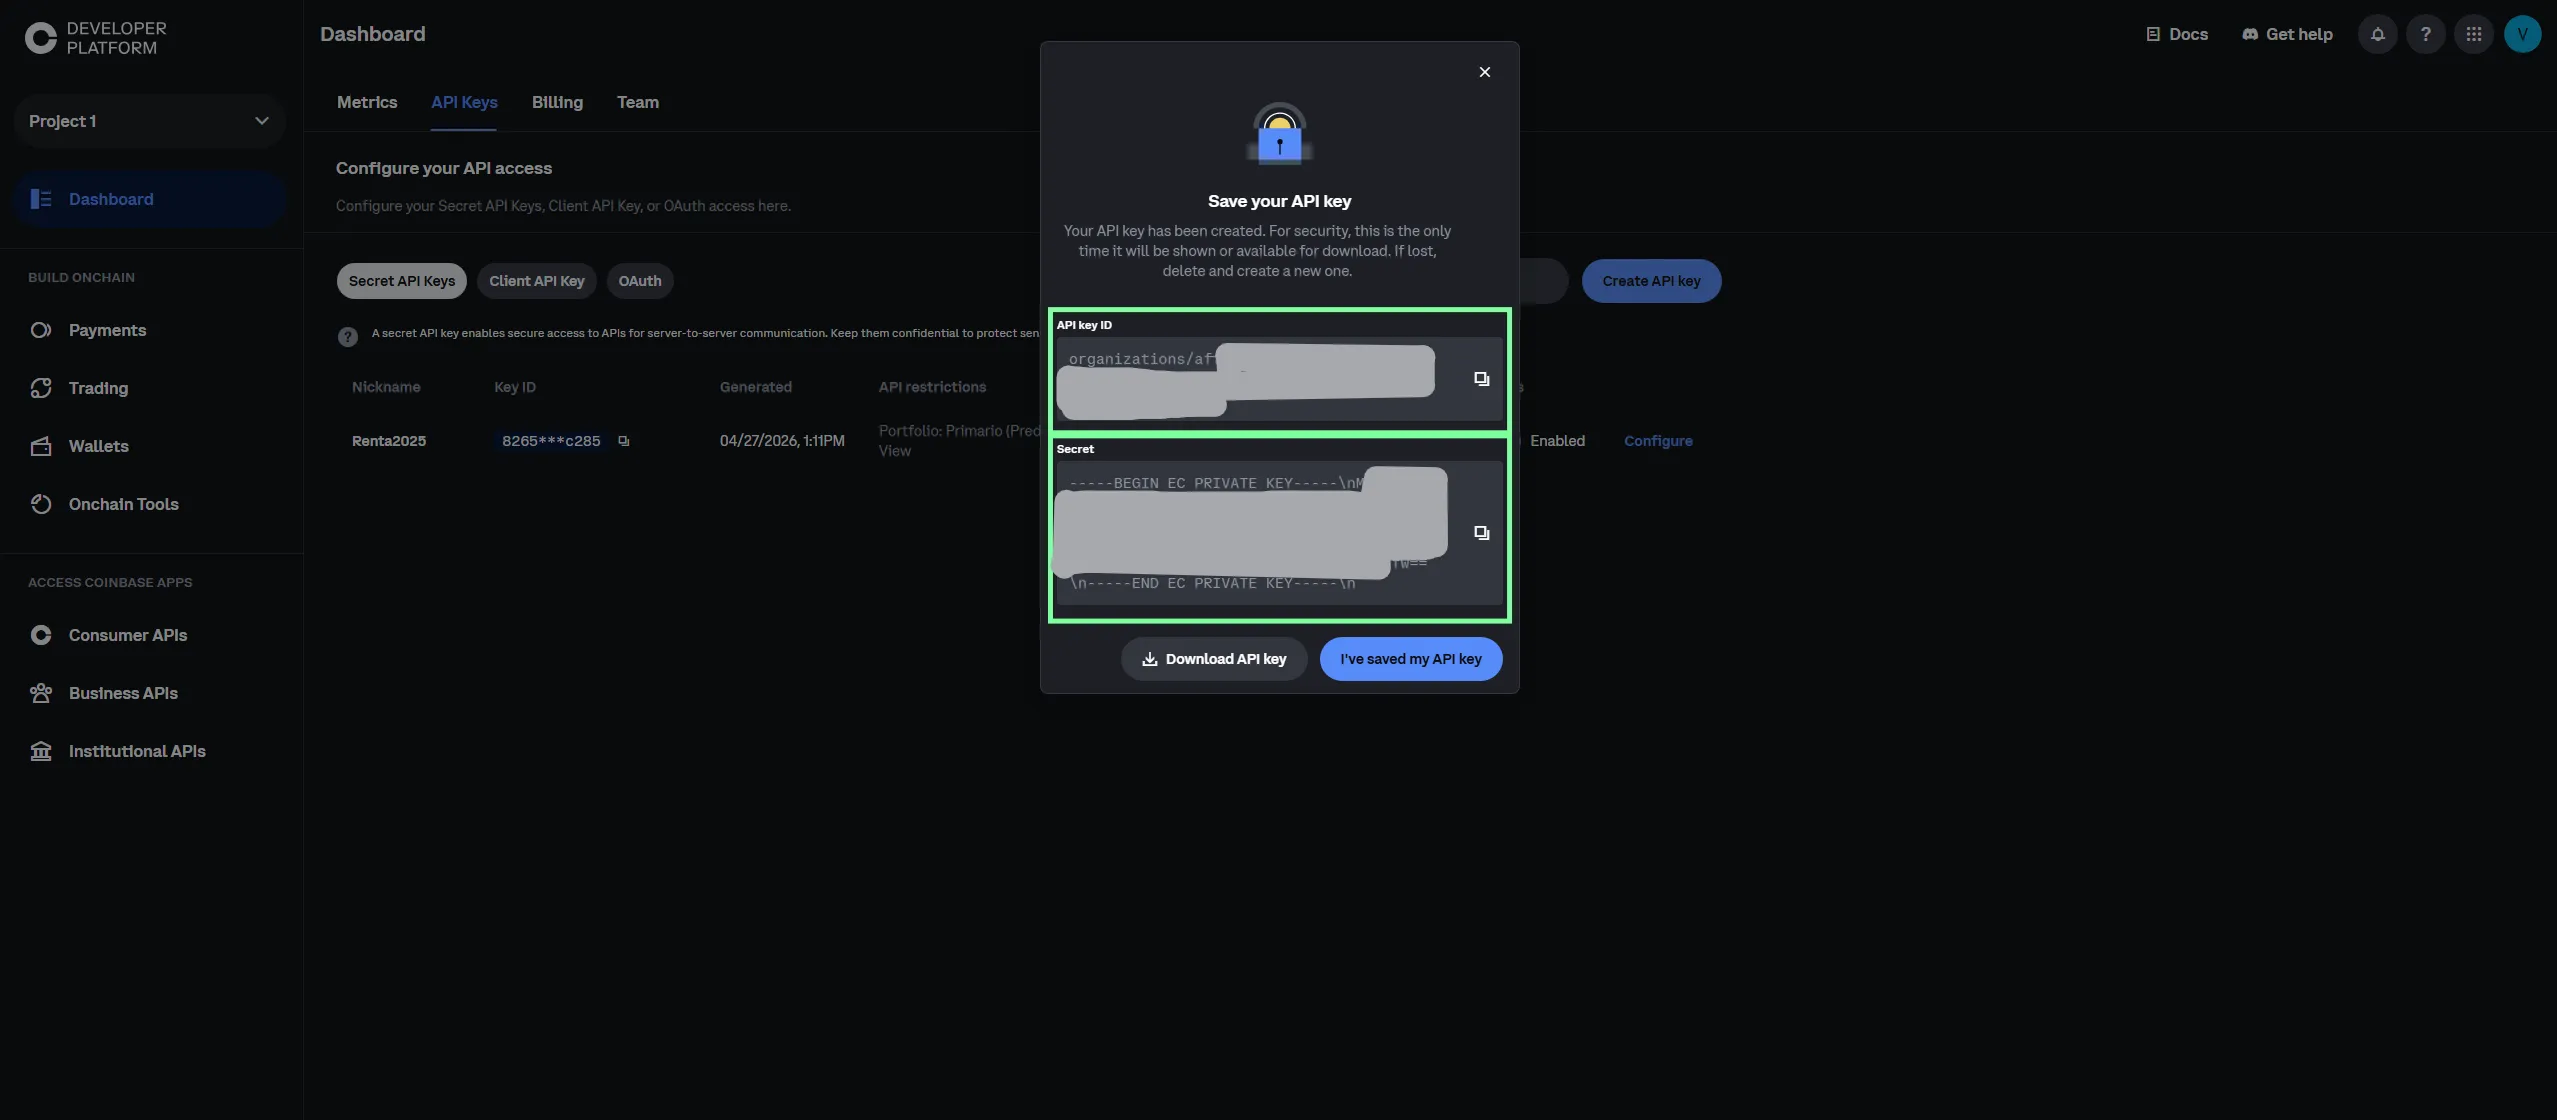
⚠️ It is shown only ONCE. If you close the modal without copying it, you will have to delete the key and create a new one. We recommend clicking “Download API key” to save the full JSON to your computer, as well as copying the values.
Step 4: send us the keys
Copy the full API key ID and Secret and share them with us through the secure channel we will point you to.
ℹ️ Expected format (copy the content in full, without trimming anything):
Key/name:
organizations/bd64b68f-1ae6…/apiKeys/…Secret/privateKey:
-----BEGIN EC PRIVATE KEY-----\nMHcCAQEEIIi…\n-----END EC PRIVATE KEY-----\nThe secret includes the literal
\ncharacters and theBEGIN/ENDmarkers. Copy it whole, without trimming anything.
Summary
| Step | Action |
|---|---|
| 1 | Go to coinbase.com |
| 2 | Open Profile > Account > Statements |
| 3 | Generate the Coinbase CSV |
| 4 | Switch to the Coinbase Pro tab |
| 5 | Generate the Account file (CSV) |
| 6 | Generate the Fills file (CSV) |
| 7 | Repeat for each year if you traded across several years |
| 8 | Download every file from the email |
| 9 | Create the API key on the Coinbase Developer Platform (View permission, ECDSA algorithm) and send us the keys |
Need help with your Coinbase history?
At colvence we download and process your Coinbase and Coinbase Pro history. We work out every gain and loss using the FIFO method and prepare your tax return.
Get in touch on WhatsApp and we will take it from there.

Víctor Lázaro
Tax adviser, colvence.com